Tag Archives: reporting

Compare Sales With Last Year on Day in Week in Power BI

A very normal calculation we do is to compare a value, for example sales, against how we did last year. The easiest way to do this is by using the SAMEPERIODLASTYEAR function to create a measure that look like this

Sales LY = 
CALCULATE(
 [Sales]
 ;SAMEPERIODLASTYEAR(DimDate[Date])
)
Sales compared to Last Year on given dates

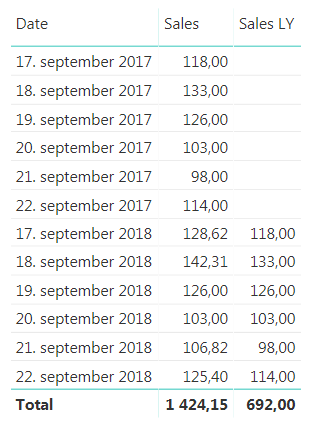
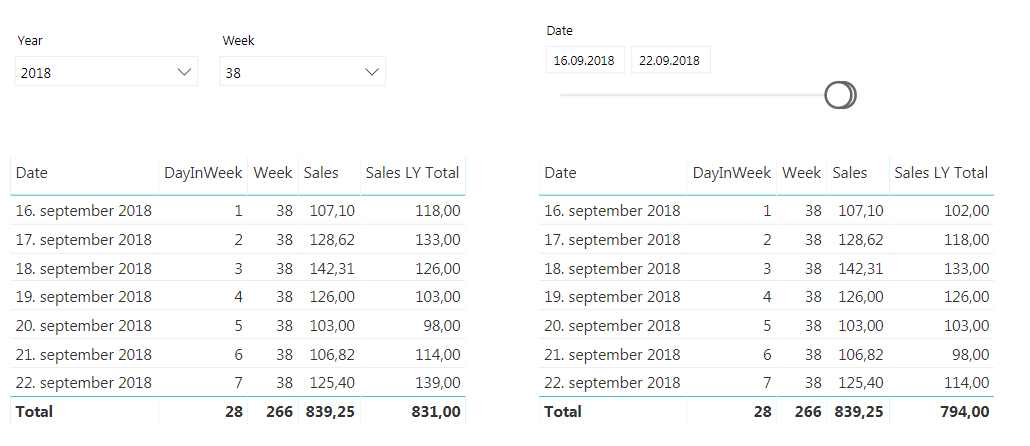
As shown in the image above this works fine for a given date, but what if we want to look at how one week compared to last year? For retailers this is a very normal demand. ow can we compare monday in one week to monday in the same week last year? After all it is a big difference in how much sales is being done on a Saturday compared to a Sunday, the shop might even be closed on sunday. For this we need to create a calculated column to help us out. We are going to call it DWY (for DayWeekYear) and we can do it like this

DWY = WEEKDAY(DimDate[Date])*1000000 
+ WEEKNUM(DimDate[Date])*10000 
+ YEAR(DimDate[Date])

Note: For people not using American calender you may need to prep week number  otherwise to get ISO week, for example in your date dimension. Then you can do the calculation. The important part is that is lines up with your definition of day in week, week number and year.

Sales for given dates with the new DWY column

Here you can see that 17th of September 2017 is a Monday, but in 2018 it is a Tuesday so we are unable to compare the two. Now, the beauty here with our new DWY column is that if we subtract one from a DWY date this year we get the same day in the same week last year. So, DWY Last Year = DWY -1. Which is great! So we can use this to create a measure that compares day in week vs the same day in week last year.

Sales LY Week =
Calculate
(
 [Sales]
 ;Filter(ALL(DimDate); DimDate[DWY] = Max( DimDate[DWY])-1)
)
Compare sales on day in week to last year

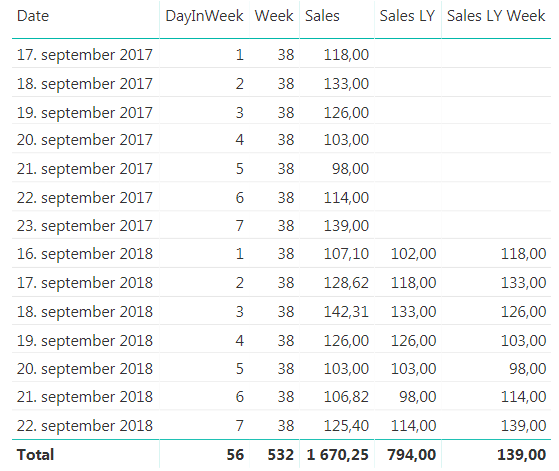
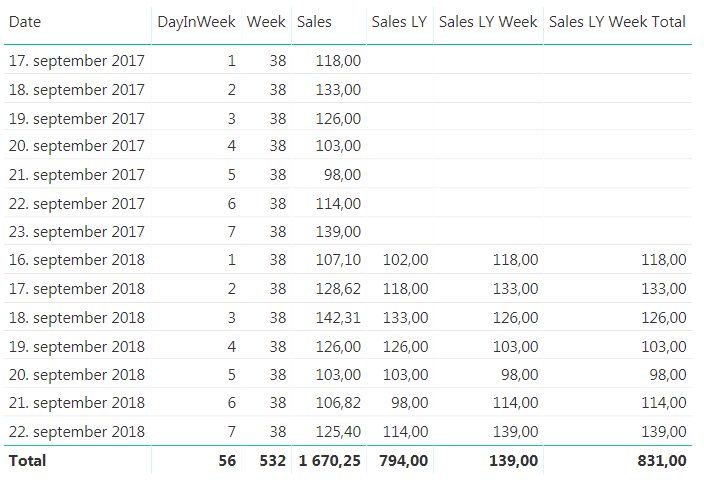
This works great when we look at a specific date, but you will see that the total row for the new measure is the same as the last value, and not the sum, so we have to extend it a little bit to make it sum up all the days we are showing. To do this we will use the SUMX function to create this measure

Sales LY Week Total =
SUMX
(
 VALUES(DimDate[DWY])
 ;FactSales[Sales LY Week]
)
Finished measure to compare day in week vs last years day in week

There you have it. But can we do more? In general I don’t like having more than one measure saying the same thing. We are looking at sales for last year in both measures we have created, it is just that one is comparing with a specific date and one is comparing with day in week. I would like to just have one measure that is Sales Last Year and then we can say that if the user is filtering on a week or a weekday we will show them the day in week last year value and otherwise we will show them the specific date. Now, this might be on a case to case scenario, but if you keep both measures available to they users they will have to remember that they cannot use the Sales LY Week Total measure if they want to look at a specific date, they have to use the “normal” Sales LY measure. In my experience this is often a source for user errors that might be confusing so we can hide this complexity by combining the measure we have created.

Sales LY Total =
IF
(
 ISFILTERED(DimDate[Week]) || ISFILTERED(DimDate[DayInWeek])
 ;FactSales[Sales LY Week Total]
 ;FactSales[Sales LY]
)

The finished result will behave as shown below. The same measure is used in both tables, but the one on the left is filtered on week while the one on the right is filtered by dates. If you have more ways of showing week or week day in your date dimension, like the week day name remember to include them in the IF statement to make them work as we want them to.

Sales filtered by Week (left) and dates (right)

“The Little of Visualization design” – with Power BI

Andy Kirk has an excellent series called “The Little of Visualization Design” where he gives small tips and tricks that can improve your data visualizations. If you have not seen it I strongly recommend it. Now, what I am going to try and do every week after summer vacation is to try and show you have you can take these tricks and use them with Power BI. But let’s kick start it now with part 1, dual labeling. I  suggest that you read the original post by Andy first so we are at a common ground about what we are going to look at which is this pie chart.

Dual labeling. It is suprisingly normal to see and it generates more cluster on your data visualisation than you need. Repeating something will not make things clearer, it will just create more ink on your graph and make it harder to focus on what’s important.

Now if you punch in the data and create a pie chart in Power BI we get what is shown below.

So Power BI does not provide you with a dual labeling issue at front, but it is quite easy to reproduce it with Power BI. In the “Format” pane you have a bunch of options which usually are great, but you have to use it with care and have a clear vision of why you are changing the original chart if not you can end up with all of these different variations.

The one in the bottom left is probably the closest to the one in the original post. It has dual labeling, and it has quite similar colors on the pie slices. Andy Kirk’s proposed solution is to remove the labeling and provide it directly onto the pie since the colors in the original graph is so similar. Now, that doesn’t  sound to far away from the default graph that Power BI provides us with. However the default is not perfect and here is what I would do in order to improve it:

  1. In Label Style choose “Category, data value”. This makes us see the actual number.
  2. Increase font size of detail label.
  3. Increase font size of the title. In general I think all default font sizes in Power BI are too small. I always feel like I need stronger contact lenses when creating a chart…
  4. Sort the chart by value so the slices appear in order of size.
    Note: I had originally made the font size of the detail label a bit bigger. However, this made the detail label for Canada disappear. Probably because it would take up the same space as Israel. So I wish they could make the position of the label a bit more dynamic.

In the end we end up with the chart below. So all in all the default chart Power BI created wasn’t too bad, but it could be improved. And make sure you are aware that not all options in the format pane in Power BI makes your data visualisation better, it could make it worse!

I’m looking forward to some weeks of summer and then I’ll continue this series when I am back! Thanks for reading. If you have any questions or feedback drop me a comment, it is greatly appreciated.

Creating a Dynamic Dashboard of Datazen Dashboards

One of the projects I’ve used Datazen was a project that needed operational reporting. These dashboards was to be updated at least every 10 minutes and was placed on big screens around the work area where it was needed. We also created an overview, or landing page, for super users that needed to have quick access to all dashboards without waiting for the dashboards loop on the big screens.

In the beginning this landing page was just a static html site, as we didn’t want people to use the Datazen portal at that point. Every dashboard had a static thumbnail and when a user clicked on a thumbnail they were brought to the respective Datazen dashboard.

This worked fine, but it required every user to go into each dashboard to have a look at the status since the thumbnail did not change. So we decided to spend some time to create a dynamic landing page, or a dashboard of dashboards that showed real time thumbnails of the dashboards. By doing this they couldn’t necesserily see the numbers on all of the dashboards, but they would be able to see status and where things where green or red.

Datazen can be embedded in web pages by the use of iframes. Doing this gave us a more dynamic page that was refreshed when a user entered the site or after a given interval if they stayed on it. What you will notice if you try this is that a click on a dashboard will not open the dashboard itself, but instead you will be able to interact with the dashboard in the iframe. In our case, this was not what we wanted as the purpose was to just see the status and when a user clicked on a dashboard they were sent to that specific dashboard to get more details and in full screen.

In order to solve this we created a new <div> called clickCatcher with the same size as the Datazen “thumbnail”, and made transparent. This allowed us to display the dashboard in the size of a thumbanil, but open the dashboard when it was clicked instead of interacting with the small version. The code for one thumbnail is posted below.

It’s a neat little trick that made us able to create a solution that was easier, an better, for the customer. Too see how you we auto refreshed dashboard pages you can take a look here.

HTML

<div id="kpi" class="kpi">
<a href="LinkToDashboardPage" class="thumb">
<div class="clickCatcher"></div>
<iframe src="LinkToPublicDatazenDashboard" style="overflow:hidden;overflow-x:hidden;overflow-y:hidden" frameborder="0" height="157px" width="300px"></iframe>
</a>
</div>

CSS

.clickCatcher{
display: block;
background-color:rgba(255, 0, 0, 0.0);
height: 157px;
width: 300px;
position: absolute;
}

LoadingDashboards
All dashboards are refreshed when the landing page is opened
DashboardDashboardExample
How the dashboard might look. Clicking on a thumbnail will take you to the full size dashboard


Why I really like Datazen as a visualization tool

I was really excited when I saw that Microsoft had bought Datazen. I have been able to use Datazen for a while already, and I really like the product. At the Gurus of Business Intelligence conference in Oslo in 2014 I was lucky enough to be able to have a session together with Marc Reguera, @marcreguera, where I spoke about mobile and touch based reporting using Datazen as the example app.

Now why do I like Datazen? First of all I think they have a clear vision, a vision I like. They want to create great data visualizations for mobile and touch based devices which are easily designed and shared with others. It is not a data discovery tool like Qlik or Tableau so you need to have your data organized in order to get the full effect. But when you are ready to create visualizations and share those with your coworkers it is really good in my opinion. You have predefined graphical elements you drag and drop onto your design surface and connect your data to. You also have the possibility to create custom maps and color palettes with backgrounds to get the right feel for your dashboards.

Datazen has three major components. You need a Datazen server in order to get data from other sources than local Excel files. When you have created a dashboard you are also able to deploy your dashboard to the Datazen server so it can be consumed by others. The server also grants you access to a control panel where you can setup KPIs, set permissions, set up connections to your data sources and create data views which can then be imported into your dashboards.

This brings us to the other two parts of the Datazen stack, the viewer and publisher apps. The publisher app is only available on Windows 8 devices at this point. This is where you import your data and create your dashboards before you can publish them to the server. The publisher itself is also made for touch so using f.ex a Surface to create visualizations on the go, or in a demo environment, is a real joy! It is quite fast to setup a dashboard design and connect your data to the graphical elements you have available. In my eyes this is a really important feature because it allows you to quickly iterate over different designs. I don’t know how many times a client has come back and said “But that’s not how I visualized the report in my head”. Now you can sit with your client and quickly make a new version of the same dashboard right there and then. I have several times prepared a dashboard to present in a demo, but have found myself creating a dashboard on the go instead. Because it is easy to do so. Because I can. You can even hand over your computer to the client and let them create the dashboard during your demo!

The viewer app lets you consume dashboards deployed to a Datazen server you have access and is available for all mobile platforms as a native app. If you are used to Android you will still have the Android feel unlike some apps that have been made to fit all platforms, but rarely do. When you design a dashboard you create several versions of the same dashboard to fit different resolutions. A dashboard made for a phone may have to emphasize different things than one made for a laptop, simply because some graphical elements, like a map, is perhaps not that suited for a small screen. Datazen also gives you offline access to your dashboard which I think is absolutely essential for all apps.

You can download the Datazen publisher for free from the Windows 8 store and use local Excel files to create your own stunning dashboards right away. If you want to share those dashboards or get data from your databases or other sources, you will need access to a Datazen server. When the announcement was made Microsoft also announced that SQL Server Enterprise Edition customers with version 2008 or later and Software Assurance are entitled to download the Datazen Server software at no additional cost. Give it a go. It is a really well made product, and a lot of fun to play with! The road from raw data to presenting them on a well made dashboard on someone else’s mobile phone is getting shorter!

For more information go to http://www.datazen.com/.

Example of a dashboard made with Datazen